 Cleaning your dog’s ears is an important part of their overall hygiene routine, and it can help prevent ear infections and discomfort. Here’s a step-by-step guide on how to clean your dog’s ears safely:
Materials You’ll Need:
- Ear cleaning solution: You can purchase a dog-specific ear cleaning solution at your local veterinary clinic. Do not use alcohol, hydrogen peroxide, or other household products, as they can be too harsh for your dog’s ears.
- Cotton balls or pads: These are used for wiping the ear after cleaning. Avoid using cotton swabs (Q-tips) as they can push debris deeper into the ear canal.
- Treats or rewards: Having treats on hand can make the experience more positive for your dog.
Steps to Clean Your Dog’s Ears:
- Gather Your Supplies: Ensure you have everything you need within arm’s reach to prevent leaving your dog unattended during the cleaning process.
- Prepare Your Dog: Before you begin, make sure your dog is calm and relaxed. It may help to have someone hold or distract your dog with treats or gentle petting.
- Examine the Ears: Carefully examine your dog’s ears for any signs of redness, swelling, discharge, or a foul odour. If you notice any of these signs or if your dog seems to be in pain, do not attempt to clean the ears yourself; instead, consult your veterinarian.
- Apply the Ear Cleaning Solution: Hold your dog’s ear flap (pinna) up and gently lift it to expose the ear canal. Squeeze a small amount of the ear cleaning solution into the ear canal. Be sure to follow the instructions on the product label, as some solutions require you to massage the base of the ear for a certain period to help break up debris.
- Massage the Ear: After applying the solution, gently massage the base of your dog’s ear for about 20-30 seconds. This will help distribute the solution and loosen any debris or wax.
- Let Your Dog Shake: Allow your dog to shake its head. This will help dislodge any loosened debris or excess solution from the ear canal.
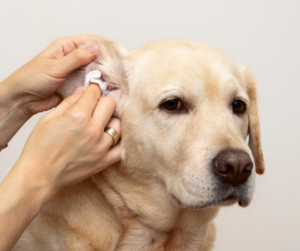
- Wipe the Ear: Using a cotton ball or pad, gently wipe the visible parts of the ear, especially the ear flap and the area where the ear meets the head. Do not insert anything into the ear canal, as this can damage the delicate structures inside. We recommend visiting our nursing team for a demonstration on how to wipe the ear safely.
- Reward Your Dog: Once you’ve finished cleaning one ear, reward your dog with treats and praise to make the experience more positive.
- Repeat on the Other Ear: If your dog is comfortable, repeat the process on the other ear.
Frequency of Ear Cleaning:
How often you clean your dog’s ears will depend on their breed, activity level, and individual needs. Some dogs may require regular ear cleaning, while others may need it less frequently. Consult your veterinarian for guidance on an appropriate cleaning schedule for your specific dog.
Remember, if you ever notice any signs of ear infection or discomfort in your dog’s ears, such as redness, swelling, odour, or unusual discharge, consult your veterinarian promptly. Ear infections can be painful and require medical treatment. Regular ear cleaning can help prevent such issues, but it’s essential to do it safely and with your dog’s comfort in mind.